
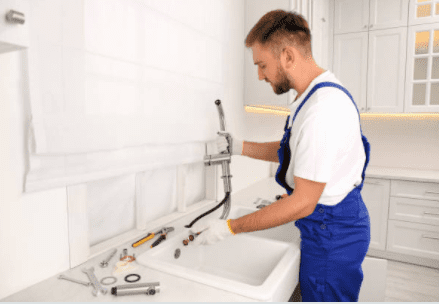
How to Fix a Leaky Faucet
Most of us pretty much forget about our water source after installation but revert to them when a problem arises. This makes them more susceptible to leaks or drips. A dripping or leaky faucet means more harm than good as far as your monthly water bill is concerned.
Not to mention the annoying sound of dripping water that can do a number on your sanity; therefore, they must be fixed immediately. The good thing about a leaky faucet is that you can easily fix it yourself. Let’s look at different ways to fix a leaky faucet in your home.
What Causes a Faucet to Drip?

Before looking at various ways of fixing dripping faucets, it’s wise to look at the root cause of these problems. Common causes of a leaky faucet include defective O-rings, washers or gaskets, mineral deposits on its internal parts, and corrosion.
Faucet Corrosion
A faucet can experience corrosion at the valve seat. It’s a connector between the spout compression structure and the faucet. The valve seat should be regularly cleaned to avoid corrosion. When you have a leaky faucet due to corrosion, then it’s highly recommended to call a professional plumber.
Defective or Worn O-rings
An O-ring that’s not functioning properly may cause the faucet in the kitchen or bathroom to drip. O-rings hold the faucet handle together and can sometimes wear out after many uses. When this happens, you get a dripping faucet. You can easily fix this problem by replacing the O-ring in the faucet.
Possible causes of a leaky bathroom faucet
As far as the dripping faucet is concerned, the above troubleshooting problems are likely to cause them. Now, let’s delve further and find out what causes bathroom leaky faucets.
A Worn-Out Internal Washer
Defective washers and those that aren’t properly installed are the main root cause of the leaking faucet-any moment you use your bathroom faucet; this washer is forced up against the valve seat to cause friction. A telltale sign that your valve seat washer has a problem is when you notice drips around the spout. You can easily rectify this by simply replacing it with a new washer of the right size.
Broken Plumbing Systems
In rare circumstances, broken plumbing can cause leaky faucet handles. It may as well interfere with the entire pressure of your water flow. If you think this could be a reason for your bathroom faucet drips, then you must call a professional plumber immediately.
Luckily, homeowners can easily repair the above problems with the right tools on a repair kit. However, if you’re second-guessing yourself, it is better to call a professional to help you fix a leaky faucet.
Fix a Dripping Kitchen Faucet with Replacement Parts
Now that you pretty much know the cause of your leaky faucet, you can use the right methods to attempt to fix it. Firstly, you’ll need to identify the type of faucet you have and the tools required for faucet repair. Here are instructions on how to fix a leaky faucet on four common types of faucets.
Before You Begin
Turn off the main water supply line. Usually, it’s underneath the sink where they run up. There are handles where you can turn off in an anti-clockwise direction to ensure you limit the water supply.
Afterward, you can plug the drain. The process will prevent things like screws from going down the drain. A sink plug can work fine, but you can use a rag if you don’t have one. Lastly, you need to identify the type of faucet you have.

A compression faucet is the easiest to identify; it has two handle screws for cold and hot water. The other three have a swivel arm that you can turn from side to side to switch on the temperature of the water. You’ll also need to pick apart their internal mechanism to know which one you’re dealing with truly.
Ball faucets have ball bearings, while a cartridge faucet contains a cartridge. The cartridge is usually made from different materials, but most of them have a decorative cap. On the other hand, a ceramic disk faucet has a ceramic cylinder.
Materials Required
Now that you know the type of faucet you have, you’ll need to gather all tools required for this faucet repair project. You can contact your nearest hardware store and acquire a faucet repair kit. It has all you need to fix a leaky faucet. Let’s list some of the materials and tools you’ll need.
- Flat head screwdriver
- O-rings
- Replacement cartridges
- Professional plumber’s grease
- Replacement rubber washers
- Pliers
- Allen wrench
Fixing a Rotary Ball Faucet Anatomy
- The first thing you’ll do while fixing a ball faucet is buying a replacement parts kit at your nearest store. Ball faucets require special tools and replacement parts found only in this kit.
- Unscrew and remove the faucet handle. Lift off the faucet handle and place it aside.
- While using pliers, remove the cap as well as the collar. Remove the washer, ball, and faucet cam with the tools provided on the replacement kit. Usually, it appears like a socket and ball joined on the faucet body.
- Using needle nose pliers, remove the inlet rubber seals and springs.
- Install new O-rings. Remove the old ones, then coat the new O-rings professional plumber’s grease.
- Afterward, you can install springs, a rubber washer, and valve seats. Essentially, here you reverse the above process for this installation.
- Lastly, reassemble the faucet handle to repair the leak.
Fixing a Compression Faucet
Here’s how you replace faulty parts on a compression faucet.
Remove the Faucet Handle
Pry off the decorative cap, usually reading hot and cold, using a screw.
Take Out the Retaining Nut
Use a wrench to get the retaining nut off. Once removed, you’ll see a stem above the O-ring, usually on top of the valve seat washer.
Pull the Stem Off
Lift off the stem to expose the O-rings. Usually, O-rings look thinner than a rubber seat washer. If your faucet handle is leaky, then you’ll need to replace the O-rings. Ensure you take the old O-ring to the hardware store for the right kind.
Remove the Seat Washer
The seat washer is held in place with an upside-down screw made of brass. To remove it, you’ll need to unscrew it.
Install a New Seat Washer
Before buying a new washer, you must determine its size. The right size will fit nicely, ensuring the leak stops. So, you must go with your old washer to the store to find the same size. Make sure you coat the washer with the plumber’s grease before installing.
Reassemble the Faucet Body
Once the new seat washer is fitted nicely, you can then reassemble the faucet back to its original stature. Usually is the reverse of this entire process. Any minor leaks should stop at this point.
All About Cartridge-Style Faucet Repairs
If you have a straight cartridge faucet, here’s a step-by-step guide to what to do when it leaks.
Remove the Faucet Handle
First, pry off the handle from the faucet body, meaning prying off the decorative cap to remove the handle. Tilt the handle backward to remove it.
Remove the Retainer Clip
If applicable, remove the retaining clip. A threaded piece (usually plastic) that holds the faucet cartridge in place. You can easily pull them out using pliers.
Remove the faucet cartridge
Once the faucet cartridge is exposed, you can pull it out to ensure it stands upright. It’s the position that the cartridge in a faucet body sits on when the water supply is in full blast.
Remove the Faucet Spout
Dismantle the faucet spout to expose the O-ring.
Replace O-ring and Cartridges
If you’re replacing O-rings, cut the old ones with a knife, and coat them in a plumber’s grease before installing them back. Suppose you intend to replace the old cartridge with a new cartridge. You must buy a new cartridge that matches the size of your old one.
You’ll also need to match the stem ends where the handle joins together.

Reassemble the Handle
After replacing the new cartridge or O-rings, you can reassemble the handle. The process is the reverse of the pointers highlighted above.
Ceramic Disk Faucet 101 Repair Tips
Since the ceramic disk faucet has a different anatomy, the steps for replacing worn-out parts will be different to remove water leaks. Here’s a complete guide on how you do it.
Remove the Escutcheon Cap
Using the handle screw, unscrew and pull off the handle. You’ll notice the escutcheon cap underneath it. Remove it, and head on to the next step.
Unscrew and Remove the Disk Cartridge
When you remove the disk cartridge, it’ll expose some neoprene seals underneath the cartridge.
Replace the Seals and Clean the Cylinders
Pry off the old seals with an Allen wrench, and replace them with new ones if worn. You can also clean the cylinders. You can use vinegar to clean them, especially if you have hard water.
Soak them in white vinegar, then assess them to see if they’re reusable. If they’re worn out, you can replace them with new seals. It’s imperative you bring the old disk with you to the local hardware store to get the exact replacement.
Reassemble the Handle
After replacing worn-out parts, you can go ahead and reassemble the handle. Afterward, turn the water on slowly. This is done to ensure the newly installed ceramic disk doesn’t crack.
Follow These Basics for All Faucet Repairs
While repairing any faucet, you must follow some basic repair tips to ensure the project is done correctly. Here are some tips you need to keep in mind.
- shutoff Valves to Identify Leaks
- Order and orientation of parts is important to ensure a much easier reassembly process.
- Inspects all internal mechanism for signs of mineral deposits and deterioration.
- Take a fine abrasive and clean the aerator. Plus, soak the internal parts with white vinegar to remove mineral deposits.
- Remove worn-out parts and replace them.
- Reassemble the faucet handle. Make sure it’s turned in the middle position before opening the faucet to ensure all air is released.
If you want to buy great faucet, please choose Infaucets. If you want to learn about faucet knowledge, you can refer to these articles.